Sunday, September 15, 2013

Craft Room Tour

Sorry I haven't updated much over the last few months. I've been going through some major transitions in my life, so I wasn't sure where I'd be living. Now that I've settled down in one place, I was able to set up a full-fledged craft room! Now, I can make my crafts freely, and keep the door closed so that the messes of in-progress projects is out of sight.

Here's an overview of what my room looks like, at its four corners:


As you can see, the room is quite spacious, and it also functions as a computer room, office/study, and ironing room. The closet has extra cables, office supplies, and my nicer clothes (mostly from India).

My main work surface has a Fiskars cutting pad and my Silhouette cameo, plus a magazine rack (for inspiration), a binder of solid colored paper, and an inbox tray (for active projects).


Opening the keyboard tray reveals a scoring board, cutting board, envelope punch, and other tools.


To the left of my workspace is a set of drawers with white paper (both 65 lb. and 100 lb.), watercolor paper, transparency paper, and mailing supplies (bubble mailers, stamps, address labels, and a kitchen scale). On top of this is a basket of washi tape and a basket with markers (mostly Distress Markers and American Crafts Chromatix markers) and colored pens.


Under my desk is a Grab 'N Go box filled with wooden stamps, a plastic box of scraps, and places for trash/recyclables.


To the right of my work surface is a lamp, a lazy Susan of many crafting tools, and a few stamps I use very often.


To the right of that is my computer, which I built a couple summers ago. It was built for serious gaming, but it has seen more mundane uses, too, like browsing Facebook and playing music/videos.


In case you haven't noticed, I'm going clockwise around the room, so next up is my bookshelf. It holds my physics books from undergrad, a printer/scanner, and some crafting embellishments. In that basket are my paper punches.


I used a shoe rack to house more crafting supplies: Patterned paper on top, a couple photo boxes, and miscellaneous embellishments (mostly stickers).


To the right of that are my ironing table and my closet, which I put in the overview photos. I didn't feel the need to take a closer photo because it wouldn't add anything to this tour. So here's my shelving unit from Target. Unfortunately, each section is only 10"x10"x10", so they can't hold ll the things I'd like (I feel 12"x12"x12" is better suited for paper crafting). But, I'm happy with what I can store here.


On the top is my Sizzix Big Kick machine, plus my colored pencils, a few cute stamps, and my glitter glues and colored misters.


In one of the drawers I store all my die-cutting/embossing supplies, for use with the Big Kick. I also have stencils in this drawer. Above this drawer (not pictured) are my embossing powders and a Xyron sticker-maker (the smallest size they sell).
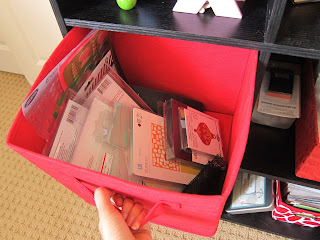

In the other drawer are miscellaneous tools that don't belong anywhere else: a circle cutter, my ribbons/twine, masking paper, etc.


Here are the other compartments. The top two have my inking pads: left for Distress Inks, right for all others. The middle row has all my clear stamps, sorted by type (sentiment, background, holiday, etc.). The bottom row has blank cards and envelopes.


It's not perfect, but I'm quite proud with how my craft room has turned out. Only time will tell how practical/useful it'll be, since I have not yet begun making cards since I set this up earlier today. If you have any ideas, suggestions, or questions about it, feel free to leave a comment.

Thursday, August 8, 2013

Paper Cranes Card and Bookmark Set


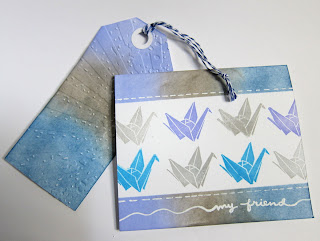
Today's card is a single layer, relying on masking to selectively Distress Ink a background. I then stamped paper cranes in two rows, added a sentiment in white, and added lines with a white gel pen.

I used a normal piece of cardstock and some temporary adhesive for the mask, so when I was done, I was left with an extra panel of Distress Inked paper. I ran it through my embossing machine, punched out a hole, and cut both corners to turn it into a tag. To give it a more finished look, I attached a hole reenforcer and some twine.


Supplies

Cardstock: Recollections
Stamps: Single Origami Crane (Hanko Designs)
Ink: faded jeans, pumice stone, shaded lilac (Distress Ink); Frost White pigment ink, Lavender pigment ink, Wild Hare pigment ink, Blue Lagoon chalk ink (ColorBox)
Pen: Uniball Signo white gel pen
Twine: Hemptique
Embossing folder: Texture Fades Rays (Sizzix/Tim Holtz)

Challenges

Lawnscaping Challenge #63: One Layer Card

Pink Sari Card


This is one of my simpler cards, simply because the sari took a lot of trial and error to construct. I cut the top from patterned paper using my Silhouette Cameo, and I covered the design with the lattice background stamp so that it was more visually interesting.

I cut a 2"x6" rectangle from the same patterned paper and also stamped that with the lattice pattern. I then scored it after 3/8", then 1/4", then 3/8", then 1/4", and so on until I reached the end of the strip. So, the scoring lines are at 3/8", 5/8", 1", 1 1/4", 1 5/8", 1 7/8", 2 1/4", 2 1/2", 2 7/8", 3 1/8", ... (See image below.)


This is very difficult to do without a scoring board, so if you want to make the pleats quickly, I suggest you invest in one.

I used washi tape to represent the cloth that drapes over the shoulder, and I stamped "Congratulations" in the same pink color I used for the lattice pattern. Since this card will be given to an eleven-year-old girl, I added pearls along the neckline, at each hip, and on both sides of the sentiment. The corners were rounded to soften the overall look.

Supplies

Cardstock: Recollections
Patterned Paper: Recollections
Stamps: Everyday Sayings (Hero Arts), Lattice Background (Hero Arts/BasicGrey)
Ink: Memento Rose Bud Dye Ink (Tsukineko)
Washi Tape: mt masking tape
Pearls: Hero Arts
Additional Tools: Silhouette Cameo, Martha Stewart Scoring Board, We R Memory Keepers Corner Chomper

Monday, July 22, 2013

"All your dreams" in pink and teal

My sister is flying back to med school, thousands of miles away, tomorrow. She had spent the last few weeks here at home, enjoying her break, but it's time for her to return for her fourth semester. Knowing I won't see her until December, I knew I must make a card for her, to encourage her while she's so far from home.


To make this card, I started with a pink ombre piece of patterned paper from the Dear Lizzy "Lucky Charm" collection. I covered it in star stamps from Lawn Fawn's "Critters Ever After" stamp set, using Versamark ink, and I embossed that in white. I then adhered this entire thing to my card base, to serve as my background.

From the same stamp set, I stamped the castle onto white, pink, and teal patterned paper from the same paper pad. I paper pieced that together and added glitter accents. I made a mask using a sticky note, and with that covering the castle, I was able to distress the paper with "tea dye" Distress Ink. I matted this panel onto another piece of "Lucky Charm" patterned paper and adhered that to my background base.

I stamped the sentiment on a piece of white cardstock and embossed it with turquoise embossing powder. I cut out a flag, adhered it with foam squares, and finished off the card with a few enamel dots from My Mind's Eye.

Supplies

Cardstock: Recollections
Patterned paper: "Lucky Charm" (American Crafts/Dear Lizzy)
Stamps: "Critters Ever After" (Lawn Fawn)
Ink: Versamark, Versafine Onyx Black, tea dye (Distress Ink)
Embossing powder: detail white (Stampendous!), turqoise (Ranger)
Enamel dots: "the sweetest thing" (My Mind's Eye)
Glitter: Clear Star Gelly Roll pen (Sakura)

Challenges

Sunday, July 21, 2013

My second color roll is developed!

Since I've been in the process of moving my craft space from one home to another, I haven't been crafting much the last few weeks. Instead, I've been focusing my creative energies on photography. Here are the results of my second color roll:


I have two black-and-white rolls that are being developed at another lab, so I won't see the results for another couple of weeks. Coming from over a decade of digital experience, where I'm used to instant results, I'm learning that film photography is a test of patience.

Tuesday, July 16, 2013

I made myself a camera!

I recently got a new camera: The Lomography Konstruktor. It is a build-it-yourself 35mm film camera that took me a couple hours to build. It came to me looking like this:


And I transformed it into this:


Within two days, I blew through three 36-exposure rolls of film. Unfortunately, my local Costco isn't able to develop the two special black-and-white rolls I used, so I'll have to look elsewhere to get those developed. In the mean time, I do have some colored photos to share:

Glimpse of Light
Lodi Beer restaurant sign
Light and Dark in the Trees

From the colored roll, only about 8 photos came out usable, and these three are the only ones decent enough to share. Considering I have very limited experience in film photography, and I built this camera on my own, I'm pleased with the results. I need to practice more and more, and with luck, I'll have better results next time.

Wednesday, June 26, 2013

Floral Condolences Card

It's not often that I have to make a condolences card. But, such an occasion has risen, so I made this card to comfort a friend of mine.


Supplies

Paper: Recollections (both card base and patterned paper)
Stamps: Hero Arts ("Everyday Sayings"), Hero Arts/Basic Gray ("Indie Bloom"), Inkadinkado ("Vintage Flora Cling")
Ink: Memento ("Rich Cocoa")
Markers: Distress Markers ("barn door," "vintage photo")
Twine

Thank You kids' cards

My birthday was the other day, and I spent the day visiting family in Fresno. My eight- and three-year-old cousins made me cards, and they really made me feel special that day. So, in return, I made them both "thank you" cards. They both are relatively small -- at 3.75" by 3.75" --


This was a simple card. I played off the colors in the background when cutting up thin strips of solid paper from my scraps. I then stamped a pink owl and fussy-cut it out, attaching it with foam squares for a bit of dimension. I wrote "thank you!" in black pen, added dashed lines in white pen, and finished of the card with a few gems.

Supplies

Paper: paper strips from my scrap pile
Stamps: owl from studio g
Ink: Versafine ("Onyx Black"), Colorbox ("Orchid")
Gems: Recollections
Pens: black Copic Multiliner, white Uniball Signo


I colored this card directly using Distress Markers, except the rabbit. I don't yet have any gray markers, so I dabbed a little of the "black soot" marker onto an acrylic block, diluted it with a lot of water, and lightly brushed that onto the rabbit to create a light gray. I let it dry and gradually layered it a bit for the shading. I used foam adhesive to attach the banner, bird, and bunny. Again, I used gems to finish off the card.

Supplies

Paper: Recollections
Stamps: vine from studio g, everything else from Lawn Fawn (banner and sentiment from "Home Sweet Home," bunny and flowers from "," tree and kookaburra from "Critters Down Under")
Ink: Versafine ("Onyx Black"), studio g (lime green)
Markers: Distress Markers (black soot, spun sugar, worn lipstick, barn door, mustard seed, peeled paint, broken china, antique linen)
Gems: Recollections

Challenges

Sunday, June 16, 2013

Father's Day Card


My card today is more clean-and-simple than my usual fare of cards. I think it's because the style lends itself well to masculine cards, and this approach suits my dad. I took some origami paper from my stash, cut 2.5"x2.5" squares out of them, and turned each one into an origami tie. I used a sentiment from Lawn Fawn and foam squares to attach the ties. My mom particularly likes this card because she could see my dad wearing ties with each of those colors and patterns; they're perfect for my parents' sense of style.

Happy Father's Day!

Supplies

origami paper
Stamps: Lawn Fawn ("Happy Everything")
Ink: Memento Tuxedo Black

Challenges

Get *Well* and Welcome Home cards


My mom gave me the idea for this card, but I didn't have any stamps to convey it, so I hand-drew everything (except the clouds) to make it. I am, by no means, a skilled artist. This is my first attempt at drawing and coloring a structure of any kind.

I began by sketching out the well, overhang, and pail separately on a piece of paper, using photos online for reference. I used Copic Multiliners to trace over select lines, and when the ink dried, I erased the pencil lines underneath. I used Distress Markers and American Crafts Stamp Markers to color everything, trying my best to establish lighting and depth.

I cut out each element and tied some white embroidery thread (taken from my mom's sewing supplies) around the pole and through a hole I poked through the pail. I then put foam squares on the overhang to attach it to the well, and both the overhang and well were glued down to the card. The pail is left open to hang. I stamped the two clouds, drew a horizon/grass line, and used a waterbrush to lightly add color to the background. I finished it off with the words "get" and "soon" to complete this punny sentiment.

Supplies

Cardstock: Recollections
Stamps: Lawn Fawn (clouds from "Sunny Skies")
Pens: black Copic Multiliners
Markers: Distress Markers (broken china, tumbled glass, bundled sage, peeled paint, barn door, antique linen); American Crafts Stamp Markers (Powder, Brown Sugar)
White embroidery thread


My second card was made for my sister, who recently returned home from yet another semester abroad in med school. I hadn't seen her since January, so I knew I had to make her a card to celebrate her safe return (and her passing her classes).

I simply stamped all the elements in black ink, colored them using Distress Markers and American Crafts Stamp Markers, and fussy-cut them all out. For the background, I dragged a rectangular panel through a diluted mix of "broken china" and "tumbled glass" Distress Markers (I scribbled both onto a craft sheet and sprayed it heavily with water).

I glued down the sun, clouds, and homes, and I used foam squares to attach the birds and banner. The word "home" is stamped, while the word "welcome" is handwritten using a Copic Multiliner pen. I used the same pens to add dotted lines to the panel, and I rounded the corners of the white panel before attaching it to my card base.

Supplies

Cardstock: Recollections
Stamps: Lawn Fawn ("Sunny Skies," "Blue Skies," and "Home Sweet Home")
Ink: Versafine Onyx Black
Markers: Distress Markers (mustard seed, wild honey, spun sugar, tumbled glass, barn door), American Crafts Stamp Markers (Key Lime, Powder, Lavender)
Pens: black Copic Multiliners

Thursday, May 9, 2013

"Loving, Kind, and Fearless" Mom Card

Mother's Day is coming up, and I made a card to celebrate my mom. I recently came upon "the sweetest thing" collection by My Mind's Eye, and its colors and flowers reminded me of my mom, so I had to use it for this project. She loves flowers, and bright colors like mustard yellow and coral red are right up her alley.


From the patterned paper pad, I found the "loving, kind, & fearless" sentiment, which perfectly describe my mom. I used that panel as a jumping off point, drawing inspiration from it for the rest of my card.


I used a coordinating flower stamp from the same collection to stamp the flowers repeatedly on watercolor paper, making a background of sorts. I then colored those flowers using Distress Ink and Stamp Markers and a waterbrush, achieving a watercolored look. I stamped two more flowers on a separate piece of paper, colored them in, fussy-cut them, and popped them up on the watercolored panel to add some dimension.


From there, I added the sentiment panel, along with two brads and two yellow enamel dots (all from the same collection, of course) to finish it off. I then attached some patterned paper to an envelope for a special touch, and I couldn't resist putting a fake flower inside the envelope for an added surprise.


Supplies

Paper: Recollections (card base), Strathmore (watercolor paper)
Patterned paper: My Mind's Eye ("the sweetest thing" collection)
Stamp: My Mind' Eye ("the sweetest thing" collection)
Ink: Ranger Archival Black Ink, Distress Ink (mustard seed, spun sugar, spiced marmalade)
Markers: American Crafts Stamp Markers (aqua, key lime)
Brads and enamel dots: My Mind's Eye ("the sweetest thing" collection)
Flower: Recollections

Challenges

The Wonder of Watercolor Challenge in the Moxie Fab World