Showing posts with label home. Show all posts

Sunday, September 15, 2013

Craft Room Tour

Sorry I haven't updated much over the last few months. I've been going through some major transitions in my life, so I wasn't sure where I'd be living. Now that I've settled down in one place, I was able to set up a full-fledged craft room! Now, I can make my crafts freely, and keep the door closed so that the messes of in-progress projects is out of sight.

Here's an overview of what my room looks like, at its four corners:


As you can see, the room is quite spacious, and it also functions as a computer room, office/study, and ironing room. The closet has extra cables, office supplies, and my nicer clothes (mostly from India).

My main work surface has a Fiskars cutting pad and my Silhouette cameo, plus a magazine rack (for inspiration), a binder of solid colored paper, and an inbox tray (for active projects).


Opening the keyboard tray reveals a scoring board, cutting board, envelope punch, and other tools.


To the left of my workspace is a set of drawers with white paper (both 65 lb. and 100 lb.), watercolor paper, transparency paper, and mailing supplies (bubble mailers, stamps, address labels, and a kitchen scale). On top of this is a basket of washi tape and a basket with markers (mostly Distress Markers and American Crafts Chromatix markers) and colored pens.


Under my desk is a Grab 'N Go box filled with wooden stamps, a plastic box of scraps, and places for trash/recyclables.


To the right of my work surface is a lamp, a lazy Susan of many crafting tools, and a few stamps I use very often.


To the right of that is my computer, which I built a couple summers ago. It was built for serious gaming, but it has seen more mundane uses, too, like browsing Facebook and playing music/videos.


In case you haven't noticed, I'm going clockwise around the room, so next up is my bookshelf. It holds my physics books from undergrad, a printer/scanner, and some crafting embellishments. In that basket are my paper punches.


I used a shoe rack to house more crafting supplies: Patterned paper on top, a couple photo boxes, and miscellaneous embellishments (mostly stickers).


To the right of that are my ironing table and my closet, which I put in the overview photos. I didn't feel the need to take a closer photo because it wouldn't add anything to this tour. So here's my shelving unit from Target. Unfortunately, each section is only 10"x10"x10", so they can't hold ll the things I'd like (I feel 12"x12"x12" is better suited for paper crafting). But, I'm happy with what I can store here.


On the top is my Sizzix Big Kick machine, plus my colored pencils, a few cute stamps, and my glitter glues and colored misters.


In one of the drawers I store all my die-cutting/embossing supplies, for use with the Big Kick. I also have stencils in this drawer. Above this drawer (not pictured) are my embossing powders and a Xyron sticker-maker (the smallest size they sell).
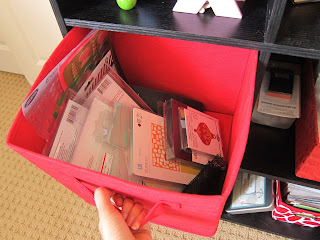

In the other drawer are miscellaneous tools that don't belong anywhere else: a circle cutter, my ribbons/twine, masking paper, etc.


Here are the other compartments. The top two have my inking pads: left for Distress Inks, right for all others. The middle row has all my clear stamps, sorted by type (sentiment, background, holiday, etc.). The bottom row has blank cards and envelopes.


It's not perfect, but I'm quite proud with how my craft room has turned out. Only time will tell how practical/useful it'll be, since I have not yet begun making cards since I set this up earlier today. If you have any ideas, suggestions, or questions about it, feel free to leave a comment.

Sunday, July 21, 2013

My second color roll is developed!

Since I've been in the process of moving my craft space from one home to another, I haven't been crafting much the last few weeks. Instead, I've been focusing my creative energies on photography. Here are the results of my second color roll:


I have two black-and-white rolls that are being developed at another lab, so I won't see the results for another couple of weeks. Coming from over a decade of digital experience, where I'm used to instant results, I'm learning that film photography is a test of patience.

Thursday, February 21, 2013

Painted Letters

I bought two more wooden letters and some masking tape, and now I can spell my nickname, "Jas":


This is definitely going on the wall of my room. I don't know if I should stay simple, keeping it to these three letters, or if I should buy the remaining four to spell out my actual first name, "Jasmine." What do you think?

Sunday, February 17, 2013

This Blog Brought to You by the Letter J

I picked up a wooden letter J and a $1 circular foam brush from Michaels, and a $6 set of acrylic paints from Marshall's, and used my minimal artistic skills (read: none) to give the letter a purple polka-dot pattern. The purple in the paint set was a bit darker than I wanted, so I mixed in a little white to get a lighter tint. Since the foam brush is circular, I just had to dab it on and rotate it a bit to get good dots.


Wednesday, February 6, 2013

Valentine's Advent Calendar

I made a nine-day advent calendar for Valentine's Day. If I had planned it far enough in advance, I could've created a fourteen-day calendar that reads "Happy Valentine" -- which sounds a bit awkward, but at least it would allow for one card for each day in February leading up to Valentine's Day. Alas, I got a late start; I was away from all my crafting supplies this weekend, since I visited my parents to watch the Super Bowl together. So I only have nine days, one for each letter in the word "Valentine."


It was quick and easy to make, using some 3x3-inch cards and envelopes, paperclips with ribbon on them, and string. I decorated each card by embossing the words "I love you" on the front of them and writing a different personal message inside each one. On the back of the envelopes, the word "VALENTINE" is spelled out. I didn't have stamps large enough to make the letters readable around the room, so I opted to write them myself using colored pencils. I alternated colors since Michaels sold multiple styles of 3x3 card-envelope sets, and I bought the two types I liked.

Here are some close-up shots of the card and envelope:


Although the dates go from Feb 6-14 (instead of the more logical 1-14), I'm satisfied with how it turned out. I'll definitely try this again with other holidays, but with better planning.


Supplies

Card and envelope sets by Recollections
Ribbon-adorned paperclips by Recollections
Colored pencils by Prismacolor
"I love you" stamp by craftsmart
Detail white embossing powder by Stampendous!
kitchen twine